Inputs
Introduction
Inputs are great for easy adjustment of control surface travels. In this article I'll explain how to use them.
What are inputs?
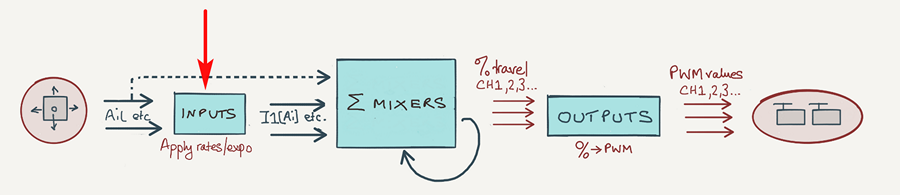
Inputs are a type of source, and can be used in the same contexts as the 'raw' sources like sticks, knobs and sliders. They differ in that they carry a weight and expo.
Inputs are the preferred sources of mixers for which routinely required rate and expo adjustment, such as the aileron, elevator and rudder mixers. On models with dual aileron servos, inputs offer a single point of adjustment for rates and expo. Another reason to use inputs is that they handle trims correctly.
Single point of adjustment
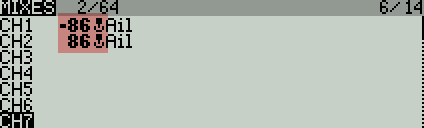
Consider a setup for dual ailerons. Each aileron is on a different channel, so two mixers are required, let's say CH1 and CH2.
Suppose we want to set the rate to 86%. First, here's how to do it using the raw sticks as sources:
Although this will work, the weight has to be entered in two places. Duplicates should always be avoided where possible.
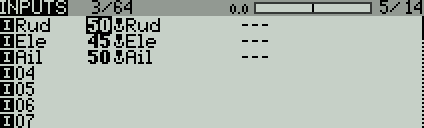
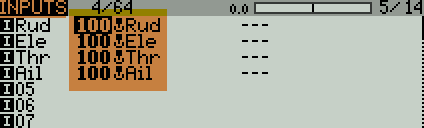
Instead, let's use an aileron input as the source. Note that inputs are distinguished by having a prefix of 'I' instead of the stick icon. This is what it looks like in the Inputs menu:

The two mixers have their sources changed from the raw sticks to the aileron input:
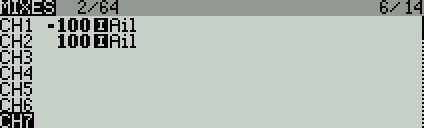
So now there's just a single adjustment for weight.
How trims are handled
Trim values may be included or excluded from the input. The default is 'On' as in the screenshot below:
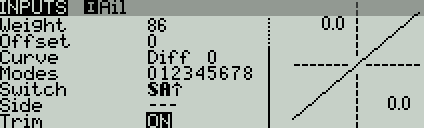
If Trim is set to 'On', then the full +/-25% of trim travel is included in the output, regardless of the input weight. If trim is set to 'Off', then the associated trim is ignored.
Where inputs are not used
Inputs aren't necessary for controls which do not require rates or expo. These include
- throttle
- crow brakes
- camber adjustment
- air brakes
You can use the regular sources for these. It's good practice to delete any inputs which are not used.
Creating and managing inputs
Inputs are managed in the Inputs menu. There are 32 inputs available, each identified by a label of the form [I]xxx. In order to do anything useful, an input must have one or more lines specifying source, weight, and diff/expo.
- Source is the raw control (stick, knob etc.) on which the input is based.
- Weight is the rate as a percentage of the raw control.
Here's a screenshot of the Inputs menu:
And here is the input editor:
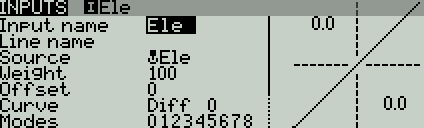
The switch and flight modes must both be satisfied, otherwise the input line is disabled. (When a line is disabled, it's the same as if the line wasn't there at all.)
System generated inputs
When you create a new model, OpenTx automatically sets up four inputs [I]Ail, [I]Ele, [I]Thr, [I]Rud. The sources of these inputs are corresponding sticks.
The order in which the inputs appear is of no consequence, as you will use their names not their line numbers when picking them.
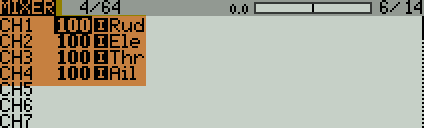
OpenTx also creates four mixers with these inputs as sources. Here's a screenshot of the Mixers menu:
Using inputs to create dual and triple rates
An Input may be have more than one line, each activated by its own switch or flight mode. You can use this to implement dual/triple rates, or to set rates automatically according to the active flight mode.
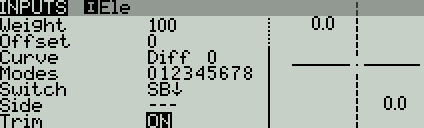
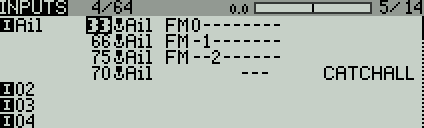
Here's an example of triple rates for aileron, using switch SB:

How it works:
- OpenTx starts at the top line. It checks the actual position of SB.
- If there's a match (SB is up), that rate becomes active.
- If there's no match, advances to the next line and repeats the test.
- And so on, until a match is found or the list is exhausted.
If OpenTx reaches the end of the list without finding a match, the input will not function at all!
To avoid any risk of this, always make the last line a 'catchall'. Here's an example. The catchall line has no condition associated so will always be selected if there are no active lines above it:
More about the 'CATCHALL' line
Having a catchall line might seem redundant, so in this section, I'll show how a simple error can have serious consequences, and how a catchall can guard against it.
So let's repeat the example in the screenshot above. This time, let's imagine that you make a error in the last line; instead of typing SB, you typed 'SA' by mistake:
I1:Ail
Ail Weight(+33%) Switch(SB↑)
Ail Weight(+66%) Switch(SB-)
Ail Weight(+100%) Switch(SA↓) -- mistake: SA instead of SB!!!
The effect of this mistake is subtle!
The intention is to activate the last line when SB is down. If SA is down, this will indeed be the case. But if SA is up, the last line will not be matched, and the aileron will freeze. So whether or not you crash will depend on the position of SA...
A 'catchall' line protects against such errors by guaranteeing a match even if there are errors in the previous lines. The rate my not be what you expect, but at least the aileron will continue to function!
How to make a CATCHALL line
To create a catchall line:
- Add an input line at the end of the list
- Set the 'switch' field blank
- All 'flightmode' checkboxes must be checked.
Using a catchall as a default
A catchall line can also function as a default setting to simplify the input list. So in the example below, SB-up corresponds to low rate, all other positions fall through to the catchall line for a 50% rate.
I1:Ail
Ail Weight(+33%) Switch(SB↑)
Ail Weight(+50%)