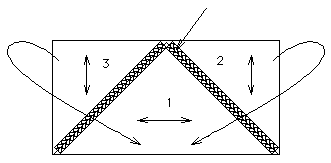
Leave these 2 sections laying out flat for the moment.

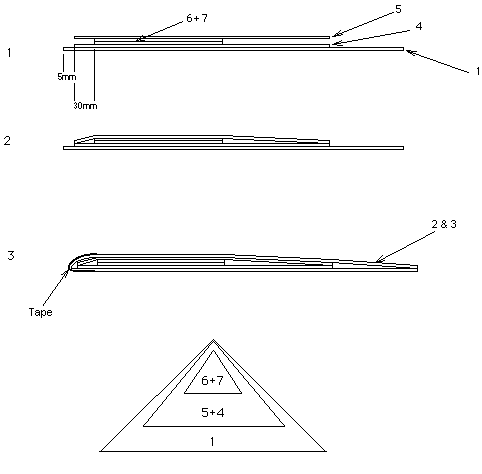
Using the spray adhesive, glue section 4 on top of section 1. The front tips (1 & 4) should be offset by 5mm.
Then glue pieces 6 and 7 together and then stick both on top of section 4, the front tips of 6 & 7, should be placed 30mm behind the front tip of section 1
Refer the diagram on the following page. Next glue section 5 on top of section 6. Make sure that the front tip of section 5 is 5mm behind the front tip of section 1.
You will see that section 5 is larger than sections 6 & 7. This is what helps form the airfoil shape. To help create the correct airfoil shape, make sure that you thoroughly stick the underside edges of section 5 to the outer areas on the top of section 4. Make sure that that section 1 remains flat on the work bench during this part of the construction.
The next step is to carefully fold sections 2 and 3 back over the top of section 5. Do not glue yet !! As you fold the section back you will observe that the tape you applied earlier makes an excellent leading edge airfoil shape. You will have to trim the adjoining edges of sections 2 & 3 slightly to avoid overlapping in the centre line area.
You then need to glue sections 2 and 3 to sections 1 and 5. Just spray the complete inside area of sections 2 & 3 and then stick it down, start by applying pressure at the leading edge and working your way back. Ensure that you keep section 1 as flat as you can.
Trim the trailing edge if necessary. Make sure that it is nice and straight. Apply some the 50mm Tape, to the trailing edge of the wing. This just adds a bit of strength to this area

Attaching the Elevons
You can now attach the Elevons. I place the 50mm tape onto the full length of ailerons first. Leave about half of the tape sticking out. This will be used as the hinge and for attachment to the wing. With the ailerons in a 70 degrees down position, stick the overhanging tape onto the wing. Make sure that the elevons move freely with +/- 80 degrees movement.
Do not attach the control horns at this time. Wait until you have installed the servos.
Rudder
Cut a channel between pieces 2 and 3 to accommodate the rudder (section 8). Glue two stiffeners of 6 x 6mm on each edge of the slot. This adds strength to the rudder area. I often travel with my Pibros, so I tape, rather than glue the rudder into the wing. I use glass reinforced packing tape for this task. You can of course glue the rudder into the wing if you desire. If you have a hot glue gun, use that, otherwise the 3M glue will work just fine.