Layout
Servos
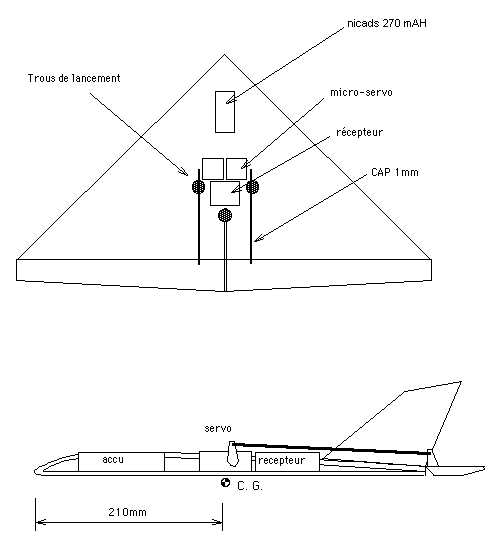
The servos should be placed over the centre of gravity, which is exactly 210mm back from the nose. Mark the size of the servos and hollow out a place for the them, make sure that they are a firm fit. To install the servos, I simply place them in the hollowed area and tape over the top of them. Place the servo horns to the outside of the wing.
Batteries and Rx
Temporarily tape the batteries (storage cells) up near the front of the wing. near their final resting place. Check the balance to see if the Rx needs to in front of, or behind the servos. With a 220mAH battery the RX usually needs to go in front, with a 270Mah pack the Rx usually needs to go behind the servos.
Adjust the position of the Battery and Rx until you have the balance very close to 210mm from the front tip, this is important
Mark the size and position of the battery and Rx and hollow out the wing accordingly. Again, I have found that simply taping over the top of these is sufficient to hold them in nicely.
I do not use a switch, but just use a short Male/Female connector cable. If use have a Rx that accepts plugs from the top, that will be perfect, you can just plug the battery connector in when you are ready to fly.
Now that you have the servos in place, install the control horns on the elevons. The are a couple of ways to install the pushrods.
The first is simply to use some 1mm piano wire with a Z bend at both ends. This is OK if you can do this accurately or you have a computer radio to adjust any difference between the two sides.
What I like to use is .025mm piano wire placed inside the inner rod of common plastic flexible control rods. I do not use the stiff outside section of these rods, only the inner section. I then tape about 70mm of the plastic rod to the wing, this acts as a very light weight and effective guide. I then insert the wire, cut to approx. length and make Z bends at each end. This wire can be kinked to get an exact length on either side. It is also easy to get into and out of the horns.
Covering
I don’t bother, as I consider this to be the first disposable R/C plane I have owned and can’t be bothered with any fancy trim. But you can cover it with sticky backed plastic trim or paint if you like. Remember that this does add weight and the aim here is to keep that to a minimum to ensure best performance on those near no-lift days.
Centre of Gravity
The Pibros is capable of exceptional as well as abysmal flying. The balance point is delicate, and precision down to the nearest millimetre will account for high performance and agility. Too much weight behind the centre of gravity and the Pibros will not fly and will have a tendency to parachute. Too much weight up front and it will fly slowly and manoeuvrability will be poor.
The C of G should be 210mm from the tip of the nose.
Elevon Pitch
The Pibros elevons have the positive incidence found in most deltas. Only 4 - 5 degrees of positive incidence is required. I find that the correct incidence can be found in flight, usually only a couple of clicks of trim is required.
Control Throw
If you radio allows, it is best to set up the Pibros for both high and low rate settings.
Low Rate - Normal Fun Flight
- Aileron Movement: +/- 20º measured at the wingtip
- Elevator Movement: +/- 10º measured at the wingtip
In good lift conditions, the glider will be quite quick. After a quick increase in air speed it is capable of doing 3 or 4 rolls in a vertical upward spin. It should have a roll rate of about 2 rolls per second.
High Rate - Madness
- Aileron Movement: +/- 45º measured at the wingtip
- Elevator Movement: +80º, -60º measured at the wingtip
Note that wide exponential (70% approx.) should be used ! These control throws, will moving you into a new dimension of flight… A multitude of known and unknown manoeuvres become possible, including parachuting, flat spins, instant stops on certain trajectories no matter what the speed, disengaging, slips, etc. Everything in flight on your doorstep.