
PMP Synergy (EPP Aileron Trainer)
I have been flying power models for some time now and developed an interest in gliding about 18 months ago. The main reason was so that I could get some flying in when my family and I were using our caravan.
Then about 3 months ago I found myself near Ivinghoe Beacon and decided to take a walk and see what this slope soaring lark was all about. To cut a long story short I saw a PMP Enigma flying and was impressed.
I went onto the PMP website and started reading about this pylon racer. I thought I may be better starting with something a bit more forgiving and came across their Synergy. This model is available in 2 versions, the Aero, which has a symmetrical wing and is fully aerobatic and the Sport, which has a semi-symetrical wing.
I put the Sport on my Christmas list!
What you get
Surprisingly little, but virtually everything you need. I say virtually, because whilst the kit contains all the EPP parts and fittings (including fittings for central or wing mounted servos) you do not get wing bands - why I am not quite sure.
I also ordered some vinyl covering tape and an aerosol of spray mount adhesive which helps the cross weave tape adhere to the EPP.
What you need
 You have a choice for the radio gear, using either one standard servo or two micro servos for the ailerons.
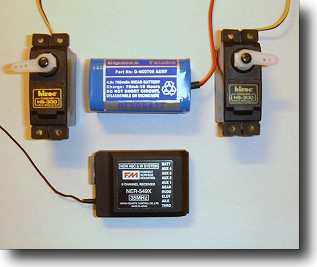
I used two JR 331 micros in each wing which then leaves loads of room in the fuselage for two standard servos (for elevator and rudder), a square AA 700Mah NiCad pack and a JR 638 PPM receiver (see photo at left).
If you opt for one central aileron servo, bear in mind that you may have to use a smaller NiCad pack, mini servos and a smaller receiver to make way for the linkages hanging within the fuselage. Balsa blocks are provided for the mounting of the servos so that you may position them accordingly.
What Now?
The instructions consist of an A4 sheet of text and two A4 sheets of drawings, one for the wings and one for the fuselage. The instructions are probably better described as an assembly guide as a couple of subjects are not mentioned at all, i.e.fuselage radio and linkage installation. However a few minutes with the instructions and parts in front of you is enough to familiarise yourself with the assembly.
 Assembly consists of coating mating parts in the supplied Bostick, wait until dry and then press firmly together. Note that you only get one shot with contact adhesives, make sure it is in the right place before pressing together!
Before you know it you will have a fuselage - it took me all of 30 minutes and I do not build particularly quickly.
You will need to cut the flutes in the correx fin and tail to form the hinges. Make two cuts for each hinge to remove a slither of plastic approx. 4mm wide otherwise the joints will interfere with each other.
Once you have a rough fuselage it is a simple matter to trim the excess with a SHARP stanley blade and then sand to shape. I used the course side of a Permagrit sanding block and it worked a treat.
As for the rods tubes, I thought that they felt a bit stiff and the correx hinge is slightly stiff too, but I tried them anyway and they work fine. The only deviation I made was to run the elevator rod straight out the back of the fuz to a central horn, as opposed to out of the side of the fuz with an offset horn. Doing it this way probably frees up the linkage but the rear of the fuz needs to be opened up so that you can get full down elevator.
The Wings
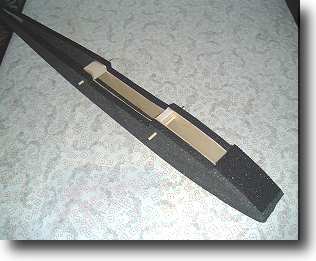
The first thing that strikes is how thin and flimsy they are. The second is how well made they look. The only preparation that needs to be done is to square off the spar slots and if you are using individual servos, you will need to make cut outs for them. I cut them straight though the wing and filled the back on covering. I then cut the grooves to allow the servo wires to lie flush with the wing.
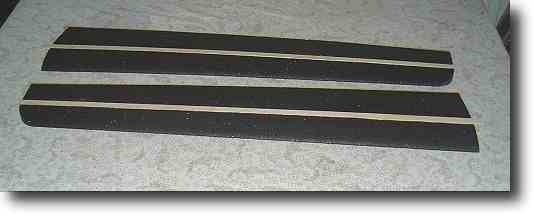
The slots have rads in the corners, which prevent the hardwood spars from fitting flush. Mention is made of this in the instructions and the method suggested works well. Cut the spars and trailing edge 2-3mm oversize before fitting as it makes for less sanding once in place.
Glue the spars and trailing edge in place and sand all the edges flush. I decided to use epoxy to join the wings and fitting the wing brace, mainly because I could not figure out how to slide in a plastic brace using contact adhesive. Once the wings are together it is amazing how rigid they become.
Fit the four plastic plates over the wing join and you are done. The plates as supplied are too small to be able to make up the four sizes of plate detailed in the instructions, so I positioned them as I saw sensible. Time will tell!!
The ailerons are balsa, and will need to be cut to length; (remembering to leave room inboard to clear to wing dowels) and the leading edges shaped to suit your installation. I.e. either top hinged for two servos and mid hinged for central servo.
So there we have it, approx. 5 hours after looking in the box I had a complete uncovered airframe. I must admit, at this moment in time I was happy with the look of the machine and I had quite enjoyed the build so far.
My, how this was to change.
Covering UGH!!
I thought I would cover the wing first as it looked easier. You cover the whole airframe in the supplied 1" and 2" cross weave tape and then, to protect the CW tape from UV you then add some colour and decoration in the form of 1" and 2" vinyl tape as supplied by PMP.
Once I started covering I felt the whole thing start to look a bit shabby, almost like covering your beautifully crafted balsa model in mahogany fablon! I persevered and it did not look too bad. You cannot use an iron to remove wrinkles and ease the covering around compound curves as you can on modern films.
Ultimately I kept reminding myself why I wanted the model, and it is to fly not to be the best looking and finished aeroplane I posses.
Final Details
I installed the servos using servo tape, wedged the receiver behind using foam and installed the battery as far forward as I could bearing in mind the lead that is required. Mine needed about 90 grams to balance as indicated in the instructions.
Flying
 Read any book and it will tell you to wait for calmer conditions to test fly and trim aeroplanes. I arrive at Ivinghoe in 30 knot blustery conditions. Not exactly text book.
With any other glider I would have turned around and walked straight back down the hill...
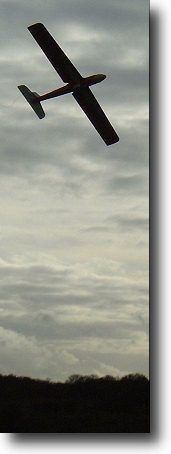
Flight No.1 – 15 seconds
A good push off the ridge and it just sat there, I tried to turn it and the wind caught it, it blew it right over my head inverted to come crashing down some 10-15 yards behind me. I picked it up, no damage.
Flight No. 2 - 45 seconds
This time I had about 5 - 6 ozs of church roof taped to the underside. This time it immediately felt better, but still wasn’t making much headway, so I thought nice and easy bring it round and add more weight.
Better landing this time, cart wheeling into a bramble bush. No damage!Flight No. 3 - 25 Minutes
More weight took the form of the above lead and a pair of pliers; we are now up to about 14/16 ozs. All this is really going against the grain – I normally try to build lighter not heavier!
Off we went - what a difference, now the Synergy penetrated, gained lots of height and was great fun to fly. I just flew gently up and down the ridge, tried some steepish turns and relaxed… slightly! I was not going to try its aerobatic abilities as I was very aware that it was still gusting up to 30 knots.
25 minutes later we are down. I packed away and walked down to the car park feeling very pleased with my new glider.
Conclusion
I enjoyed building it, hated covering it and was apprehensive about flying it. But fly it I did, in conditions that were totally unsuitable for a beginner. I nearly didn’t fly it due to the wind strength, but after driving 30 miles (and walking 1) you feel obligated to fly something.
After my first attempt at landing, a traditional model would have been carried home in a bin liner, although I would not have attempted to fly a traditional model.
From this point of view it is superb, it was acquired to take a bit of punishment from me whilst learning. It has certainly proved it can take it.
Buy one!! Who cares what it looks like?
Post Script
Thanks to my Mum for an excellent Christmas present. I gave Mum the details and phone number etc. so that she could order it by phone.
She gave me her card no. and asked me to do it in case any awkward questions were asked. Later that evening, my Mum called me to say that PMP had been on the phone to see if the kit had been ordered with her permission!
A brilliant product from an honourable company. I am impressed.
Specs
| Model | Synergy 62" |
| Manufacturer | Phoenix Model Products |
| Links | Phoenix Model Products |
| Price | See Phoenix website for latest prices |