
Eliminator SR
7 Mar 2007 John Stevens is no longer making the Eliminator SR, so contact details have been removed.
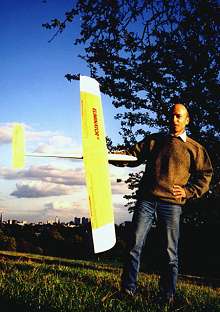 The Eliminator SR is a two-function 60" pylon racer from John Stevens, well-known UK competition flyer and kit manufacturer.
The model is probably the most popular Pylon racer in the UK and has gained an enviable reputation for quality and performance.
Two versions are available with V- or conventional tail.
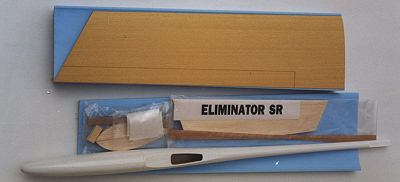
The Fuselage is glass/epoxy with extensive carbon and kevlar reinforcement. A servo tray is moulded in. A slip-on nose cone completes the package. Quality is excellent.
The RG15 Wings are pressed blue foam/glass/veneer construction. A carbon fibre leading edge is moulded in place. No surface sanding is required. Quality is first class. The Stab is cut and shaped from good quality �" balsa.
Assembly
There’s a fair bit to do, but if you follow the instructions you shouldn't have any problems. The instructions are brief but clear, the only niggle is lack of detail regarding the elevator linkage geometry. Other points:
- There’s a choice of a bolt-on or permanent tail fixing. Bolt-on means more work but it's it makes it easier remove the tail unit. Make sure the elevator linkage does not obscure access to the stab retaining bolt.
- Guide lines for cutting the ailerons are already drawn the wing. 16 knife cuts are required to separate the ailerons. You must use a non-slip straight edge for this - sandpaper glued to one side of a steel rule worked well.
- The V-tail join isn't all that strong. I beefed it up with a glass and epoxy fillet in the V. Some folks use a carbon dihedral brace.
- A computer radio is recommended, although a simple two function radio could be used quite happily with the aileron servos on a Y-lead.
- Get the adjustable brass aileron horns from Brian Anderson. They are excellent and everyone seems to use them. They are epoxied into 4mm holes in each aileron.
- There’s little guidance for the V-tail linkage in the instructions. The secret is to make sure everything lines up at right angles and you should be OK. Beware that there is very little room for mistakes.
- I covered my model in glass cloth and epoxy but you could use film on the wings. I'd be happier with a glass finish on the tail though.
- A number of items are not included: Ballast tubes, ball-links and metal clevises are available as extras from the manufacturer. Adjustable brass aileron horns are available from Brian Anderson. Not included nor listed as extras are: the elevator pushrod, 2mm wire for the elevator torque rods, and a 3mm bolt and some ply for the optional detachable stab mount – these will have to come from the spares box.
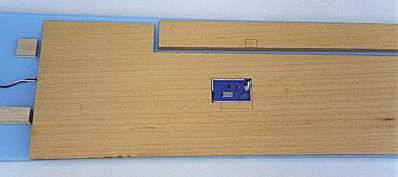
Radio and ballast installation
Fitting the optional ballast tube simply entails making a hole in the bulkhead and a smaller one in the servo tray for the securing bolt. Ballast slugs were made by melting lead into four sections of 15mm dia plumbers’ copper pipe.
The test machine was equipped with Multiplex Pico 4/5 receiver, two Volz WingMaxx servos for the ailerons, a Futaba 9601 for the elevator and a 450 mAH Nicad pack - 2/3AF size fits best.
Weight was 38oz, resulting in a wing loading of 13 oz/ft2. Ballast adds an additional 20oz upping the loading to just under 20 oz/ft2.
CG was set initially at the recommended position 70mm from the leading edge – two ounces of lead were required to balance. Control movements were set according to the instructions.
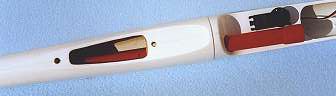
Adding a rudder
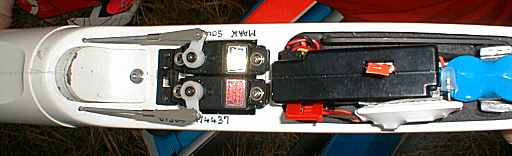
The photo above shows a rudder conversion I saw at an F3F meeting. Each servo drives one control surface - requires a computer Tx with a V-tail mixer. Note the ballast tube has been relocated down the centre line and has a ballast retaining cap which is secured by a bolt. Two mini servos either side have 1/4" push-rods which just squeeze between ballast tube and fuselage sides. Works well.
Flying
- The model can handle a good Force 4/5 without ballast.
- Stall behaviour is exemplary with little tendency to drop a wing at normal attitudes – a point in favour for pylon racing. Aileron response is also good up to the stall.
- Roll rate using recommended movements is adequate, but I increased the movement to get a crisper response. In addition, thermal turns benefit from some differential – in the end the ailerons throws were 14mm up, 6mm down.
- Tight 180� pylon turns are good. Little loss of speed once the wings are working.
- Four point rolls are sort of OK as long as you don’t dwell too long on the points. A rudder would help here for the knife edge parts.
- With a fast entry towering stall turns are possible - the model converts speed to height well, and vice versa. Accuracy at the top of a stall turn is a little hit or miss though because of lack of a rudder though.
- With the CG at the recommended 70mm position, inverted flight needs a fair amount of down elevator to hold a level attitude. Move it back, and at 76 mm the model holds inverted for long periods with only a small amount of forward stick but it’s much twitchier in pitch. I’d be happier with the CG closer to the recommended position for sport flying or pylon racing.
- Adding ballast adds to the fun. The increase in stall speed makes it important to keep the speed up - a loop with insufficient speed can result in an impressive flick. Pylon turns must be kept wider than normal when loaded up for the same reason.
- In marginal conditions, the model thermals well despite despite its 13 oz/ft2 wing loading but ultimately it’s no match for a floater.
- To control the rate of descent during landing approaches, I mixed about 20� of aileron reflex to act as a spoiler, � la the Mini Ellipse. There is a nose up trim change which I mixed out from the transmitter.
Summary
The model is a classic pylon racer – simple layout, handles well, flies fast and turns on a sixpence.
Sport/fun flyers will also enjoy its speed and good manners.
Aerobatic pilots will want to add a rudder control to extend the repertoire – I’d like to see some guidance for this in the instructions.
The price is at the higher end of the range for this class of model, however quality of materials and manufacture are absolutely first class. The important bits – the wing and fuselage - are likely to be very durable. It therefore represents good value for money.
Post Script: I’ve built two Eliminator SR's for the 1999 Pylon season, and both show the same excellence of manufacture. For example I've needed to mix and match different wing panels (because of mid-airs) and the sections have matched absolutely perfectly at the root. John Stevens also provides first rate service.
The only mod I've made is to the tailplane, replacing the M2 steel bolt with M4 nylon. This resists crash damage better - the nylon bolt sheers instead of pulling through the tailplance platform on heavy landings. I've also reinforced the stab with a full depth CF dihedral brace which makes it a lot stronger.