
Mini Ellipse
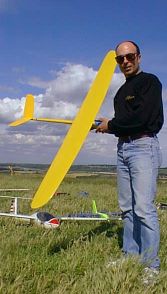 The Mini Ellipse is the original 58" (1.47m) pocket rocket from Jaro Muller. A no-compromise moulded model which differs only in size from the biggies. It's one of my all-time favourite models.
What you Get
The kit contains wing, fuselage, V-tail, instructions, and a bag of small fittings, all excellent and very lightweight.
- The fuselage is a flea-weight moulding.
- The RG15 wing is one-piece hollow moulded, very light.
- Wing skins are glass/1mm foam/glass sandwich.
- Spars are foam with carbon sock/epoxy.
- The V-tail is a one piece moulding.
Fit and finish of all moulded components are very good indeed. I've built four over the past few years and the quality has been uniform although wing weights can vary a little. My machine was supplied in yellow and blue but I've also seen various combinations of blue, red white, mauve and yellow.
Instructions
Kits from Euromodell now come with English instructions.
Installing the Radio
OK this is a grown up web site, so let's go a stage beyond building a Mini Ellipse for just pootling! We're going to have some fun...
First, please add a rudder function for aerobatics and positioning. Also do make provision for ballast - ballast turns this thing into a pocket rocket.
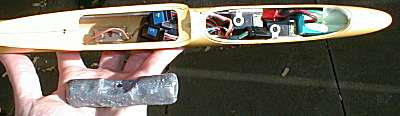
In order to leave lots of room for ballast, all the radio must be crammed forward. It's not that tricky really - just use common sense and small components. Don't be tempted to reinforce everything with wood bearers, epoxy etc - all this just adds weight, and gets in the way. Just mount the servos on balsa/ply pads and epoxy these to the fus sides.
Fit the servos one behind the other unless they are 12mm or narrower, in which case they'll go in side by side. Chop the mounting lugs off to save space.
Photo above shows from left to right: two servos and battery. The receiver is a MPX Pico 4/5 which tucks behind the servos. I use a small battery pack. All in all, there's loads of space under the wing for ballast which is just a moulded block of lead with a hole in it for a bolt through the fus floor.
The servo box in the wing has a minimum depth of 12.2mm, just sufficient for a pair of JR 341's. I've also used 85MG's which are fine as well.
Battery Pack
I have used a 250 mAH Nicad pack, and latterly a miniature 550 mAH NiMH pack dimensions 48mm x 21mm x 21mm. I get 2.5 hrs flying on one charge with the NiMH cells, and being slightly heavier requires less nose weight thus freeing even more room in the radio compartment. If you insist on using AA-size you'll have to move the gear back.
Assembly
Straightforward, only a couple of gotchas:
- A hole needs to be drilled in the wing for the aileron servo cables to exit to the fus. The correct position to avoid having to hack through foam is 10 mm behind the rear edge of the "Jaro Muller" logo.
Holes for the cables also need to be drilled in the root-side walls of the servo wells. The correct position is the rearward end of each wall.
All three holes should then line up with each other, and with the gaps in the foam, allowing the aileron cable to be pulled through with a length of thin wire inserted through the hole in the root. - Older kits were supplied with both paxolin and ali elevator horns. I used the paxolin horns since they are easier to line up. Newer kits only seem to have the ali ones. With either type, position the horns very close to the root of each elevator, to avoid them interfering with the fuselage sides.
- The wing has a steel locating peg which locates in the fuselage. The peg is a very tight fit in the wing. I drilled out the hole carefully before gluing in the peg with a tiny drop of 5-minute epoxy. The reasoning being you don't want to stress this area before you even launch the model...
All up weight is around 20 oz.
Radio setup
Futaba FF7 Glider radio was used in my first model, with an old 107R 7-channel Rx. The functions on the FF7 were as follows:
- VTAL - combined rudder/elevator
- DIFF - independent aileron control/differential (requires 7 channel Rx. If using channel 5 Rx, use channel 5 for the second aileron and fudge differential using ATV).
- BFLY – ailerons up for braking + elevator trim.
I used a 7-channel Rx, but I've been told that Futaba FF7 Glider users can make do with a 5-channel Rx. Normally you need to use channel 7 for the second aileron to set differential via the DIFF program, but in fact you can also fudge this by hooking the servo to channel 5 and adjusting differential via ATV. The BFLY (butterfly) program has a mix into channel 5 as well as channel 7, so five channels is really all you need. Note I haven't verified this fudge but it's from a reputable source (thanks, Nick).
Note (Sept 2002): I've now switched from Futaba to Multiplex. Multiplex users can feel pleased with themselves, since they can use miniature 4-channel receivers and still get all the mixing they need.
Flying Setup
All up weight without ballast is 570 gm (1lb 4oz). I've had the cg anywhere between 67 and 80 mm from the leading edge. Start at the forward end of the range. At rearward positions it's more aerobatic but handling in thermals suffers.
The manufacturer states that up to 600 gm of ballast can be carried. This has to be the highest ballast-to-dry weight of any soarer I've flown, and provides a wonderful tool for exploring the effects of ballast on handling. Just considering airspeed alone, the model will fly about 45% faster with full ballast assuming the same Cl. The downside is that the stalling speed is increased by the same amount!
Flying
I have flown the model in a variety of wind conditions, with and without ballast and with the CG in every position.
The model is great fun. It retains energy amazingly well even without ballast. With ballast it's ballistic. At the other end of the scale, the model will work small areas of lift very well indeed.
- Handling is smooth and easy.
- Thermalling in light lift is very good indeed particularly with the cg around 68 mm.
- Recommended aileron control throws are OK for tootling around. For any kind of aerobatics, increase the up-going aileron throws to the maximum. Reduce the amount of downgoing, but note the more differential you have, the lower your maximum roll rate.
- With a rearward CG (say > 72mm), the model is quite lively. Bunts (outside loops), four-point rolls and prolonged inverted flight are easy in good lift.
- With a forward CG (say around 67-70 mm) thermalling is much easier. The difference a few mm makes is surprising.
- Stall turns are reasonable if you boot in a lot of rudder. Note ruddervator movement is limited by the hinge arrangement on the V-tail, you need to find a split between rudder and elevator which suits you.
- Aerobatics in good lift are a lot smoother and enjoyable with a little ballast installed.
- Pylon turns are impressive. It can really whip round on a sixpence without losing much speed.
- The crow brakes are very effective. With this scheme, the ailerons go up about 20-30 degrees, and some down elevator is mixed in to counteract the trim change.
Thomas Hirschmann writes:
"My Mini Ellipse flies in stormy weather without problems (Force 7-8) but it needs nerves during the landing phase. Just head against the wind and push down. When the the storm is really strong, the Mini Ellipse won't penetrate but just comes down smoothly."
Ding-proof?
These plastic models tend to be made from strong materials but they aren't flexible!
The fuselage has a tendency to split at the wing locating peg. If the damage is drastic you're scuppered I'm afraid without some major work, but often you can get away with glass reinforced tape to get going again (as long as the peg itself is intact).
Delamination of the stab at the root. My first model suffered from this. My cure was to drill four or five 1mm holes in the affected area and wick some low-viscosity cyano into the cavity. Press firmly until glue is set. (Rohacell is not attacked by cyano).
Some folks reinforce this area by adding a ply platform under the V but this has worked for me.
Another approach is to make a moulded full-width saddle. Apply tape over the underside of the V and layup three or four layers of wing skinning glass cloth. Remove the newly moulded saddle from the tape and epoxy to the fuselage, trim to suit, and when dry fix the stab to the saddle using silicone rubber.
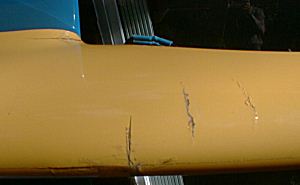 This photo shows egg-shell cracks which can appear on the fus after a while. Easily patched with lightweight glass cloth epoxied to the inside of the fus. No big deal, but it's worth watching out for particularly if you fly with ballast.
Thomas Hirschmann again:
"Take care if storing the plane in a car during a hot summers day: Temperatures above 45 Celsius can warp the wing. You can try to bend it back with a hairdryer, but this could weaken the structure."
Summary
I like...
- A brilliant general purpose soarer - nice-handling, fast and efficient.
- Aerobatic in good lift and with the CG moved back.
- Good thermalling ability in light lift.
- Inherently wide speed range, increased further by the use of ballast.
- Quite simply the most fun I've had from a model in a very long time.
I don't like
- Structure does not enjoy repeated abuse.
Put it another way, It's a hands down winner!