
'Gulp' flying wing in action over Wales
Ethos programming - quick start
Introduction
If you're new to Ethos... well, you've come to the right place! In this article, I will explain how to program a simple model - a flying wing, like the 'Gulp' in the photo. Along the way, you'll learn three key skills:
- How to use the 'new model' wizard
- How to calibrate the outputs
- How to set the rates
These will form a standard workflow for all your setups.
Create the model
The 'new model' wizard takes care of the boring work when creating a new setup. You tell it what kind of model you want, and it generates all the mixers and outputs.
The wizard supports quite complex model configurations, however we'll use it for a simple flying wing. So let's get started!
- From the main screen, press the aeroplane icon, and choose 'Model select'
- Swipe left and touch '+'. The first page of the 'new model' wizard is displayed.
- Choose either the 'Glider' or 'Airplane' section.
- Configure the model as follows:
- two ailerons
- no flaps
- no tail
- no motor
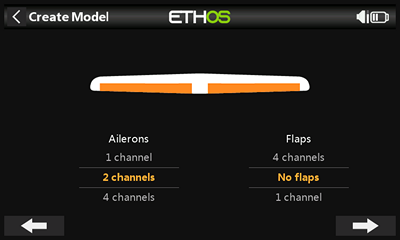
New model wizard
- Finish off by giving the model a suitable name.
The wizard creates a new model with Ailerons and Elevators mixers. Each mixer outputs to CH2 and CH5, so we'll use those channels for the elevon servos.
Set the servo rotation
The wizard may be clever, but not so clever that it knows what servos we're using. So the next task is to check and if necessary fix the direction of rotation of each servo.
- Connect up the servos to receiver channels 2 and 5. The order is not important.
- Switch on the receiver.
- Move the elevator stick and observe the elevons…
If both elevons move the correct way, say 'Woohoo' and skip to the step 4.
If both elevons move the wrong way, then: open the Mixers menu, edit the Elevators mix, and reverse the sign of weight. The change will propagate to both channels.
Change the sign of weight
If only one elevon is wrong, then go into the Outputs screen and edit the corresponding channel: change the direction from 'Normal' to 'Inverted'.
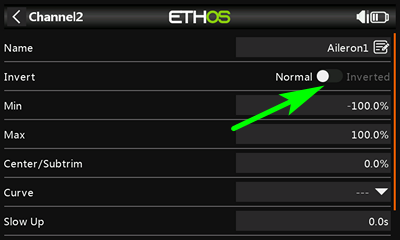
Reversing the direction of a channel
- Move the aileron stick. The ailerons will either both be correct, or both wrong. If they move the wrong way, open the Mixers menu and edit the Ailerons mix, reversing the sign of weight (the change will propagate to both channels).
- Check that the elevons respond correctly to both pitch and roll commands.
We're making progress!
Calibrate the outputs
The next task is to calibrate the outputs. In other words, set the operating range of each servo, and adjust the centre.
First, we configure the mixers and trims in preparation for the calibration.
- In the Mixers menu, go to the Elevators mix. Make sure that weight is set to 100%.
- Centre the elevator trim.
- Repeat steps 1 and 2, for the Ailerons mixer and trim.
Next, we do the actual calibration.
- Open the Outputs menu.
- For each elevon channel, adjust min and max to provide the maximum possible servo movement, subject to mechanical limits. To visualise the limits, move the elevator stick to the end stops (using the elevator stick will reveal any differences in travel between the left and right surfaces). Note that the calibrated limits will be greater than the aileron or elevator travel - don't worry, these travels are adjusted in the next section.
- Refine min and max if necessary, so that the left and right side travels match precisely.
- Adjust the centres (subtrim) of both channels
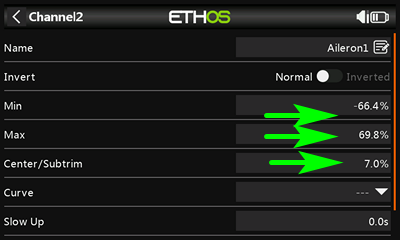
Adjusting servo end points and centre
Well done! The outputs are now calibrated, and the elevons should track nicely, regardless of mechanical differences. However the movements will be greater than is desirable for flight — we'll fix that in the next section.
Finalise control surface travel
The last task is to finalise the travel in response to pitch and roll commands. This is also called 'adjusting the rates'.
- Go to the Mixers screen
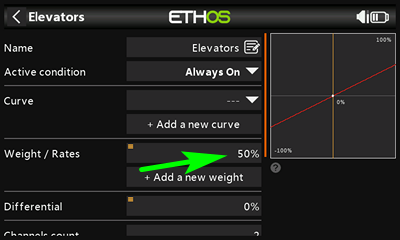
- Highlight the Elevators mix and open the mixer editor
- Adjust weight for the required elevator movement.
- If you want more up than down (or vice versa), then adjust the Diff parameter.
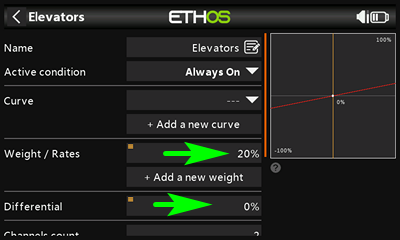
Adjusting elevator rate. Adjustments propagate equally to both elevons.
- Repeat the above for the ailerons mixer.
Failsafe
That's all the programming done. Don't forget to set the failsafe (in the RF System page), and then you'll be ready to fly...And if you don't have a flying wing, don't worry - the workflow described above will be similar for all your models!