

Advanced trims
Introduction
It's easy to take your trims for granted, but dig a little deeper and you'll find a lot of hidden power in these humble devices. You can cross them, hide them, turn them into controls, or use them as dumb momentary switches... Read on and learn all the secrets. All screenshots from X9D.
Trim basics
Like other sources, trims have their own ID's:
- TrmR - rudder trim
- TrmA - aileron trim
- TrmE - elevator trim
- TrmT - throttle trim
- Trm5, 6 (X10/X12S only) - auxiliary trims
Normally you don't need to know, since a trim's value is included in the parent control. Later, we'll see how to decouple a trim from its parent.
Independent or shared
Trims in Open/EdgeTX are very flexible. They can be independent, or shared between flight modes.
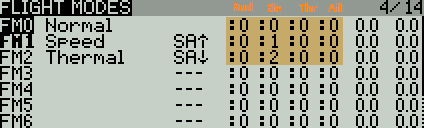
There are three options:
- ':n' means 'use trim value from flight mode n'. This option is for sharing a trim between multiple flight modes. Setting n to the flight mode number makes the trim independent.
- '+n' means add this as an offset to the trim in another flight mode.
- '--' disables the trim
Let's look at some examples:
Example: aileron trim
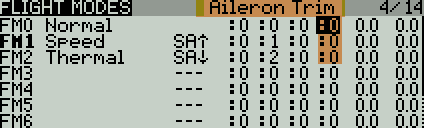
Aileron trim is normally shared across all flight modes. You can simply leave the aileron trim modes at the default ':0' in all the flight modes. This means that the trim will always read and update the value from flight mode 0.
Example: elevator trim
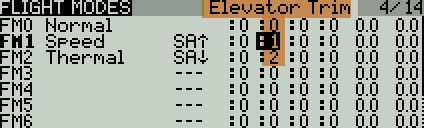
The elevator trim is normally independent in each flight mode. To do this, set the trim mode to ':n', where n is the flight mode.
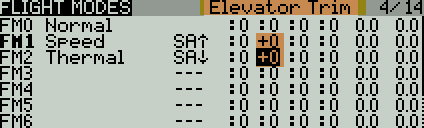
You can also designate a trim to be relative to that in another flight mode. Use the relative '+n' form, where n is the other flight mode. In the screenshot below, the elevator trim values in FM1 and FM2 are relative (added) to the trim in FM0.
Cross trims
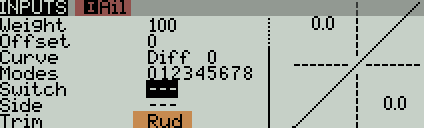
You can configure cross trims, whereby the lever is on the opposite side to the parent control. Cross trims are configured in the Inputs menu. Screenshot below shows the aileron input using the rudder trim.
Repurposing trims
A trim can be decoupled from its parent control and used to perform other tasks. To decouple a trim from its parent, specify 'no-trim' in mixers where the parent is the source.
In the following example, the rudder trim is repurposed to drive channel 7.
CH6:Rudder
-- decouple trim from parent control
Src=Rudder Trim=No_Trim
CH7
Src=TrmR
You can repurpose a trim to do different things depending on the flight mode. In following example, the rudder trim drives CH7 when FM0 is active, and CH8 when FM1 is active. For this to work, the trims must configured as 'independent' per flight mode.
CH6:Rudder
-- decouple trim from rudder
Src=Rudder Trim=No_Trim FM = FM0,FM1
CH7
-- in FM0, rudder trim drives CH7
Src=TrmR, Flightmode=FM0
CH8
-- in FM1, rudder trim drives CH8
Src=TrmR, Flightmode=FM1
You can use this technique to implement your own trimming scheme.
CH6:Rudder
-- decouple trim from rudder
Src=Rudder Trim=No_Trim
-- add trim back, you choose the trim rate!
Src=TrmR, Weight={you choose}
Using a trim to adjust a GVAR
Now here's a powerful feature: a trim lever can be repurposed to 'nudge' the value of a GVAR. This is accomplished using the AdjustGV special function, with Source set to the trim.
In the example below, the rudder trim is linked to GV1.
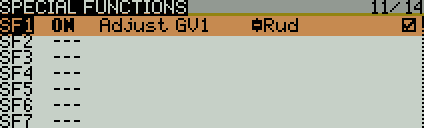
While the special function is active, normal behaviour of the trim lever is suspended - clicking the trim has no affect on its parent control, and the trim value is held at its last value. Instead, clicking the trim will cause the value of GV1 to be incremented or decremented.
Normal behaviour is restored when the special function becomes inactive.
This is easy to understand if you consider a trim to be a 'nudging' device. It can either nudge its native trim value (default), or it can nudge a GVAR (via an AdjustGV special function).
Example: dynamic diff adjustment
In the following example, we'll configure the rudder trim to adjust aileron differential (this is a useful feature for F3X gliders).
We do this in two steps:
- Link the rudder trim to GV1
- Link GV1 to diff.
The first step is to link the rudder trim to a GVAR:
So now, clicking the rudder trim will increment or decrement GV1.
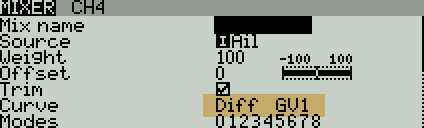
Next, in the aileron mix, we set the diff to GV1. Here's what the mixer editor looks like:
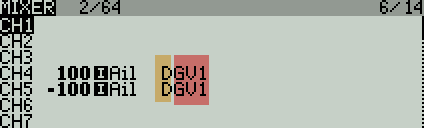
The left/right ail mixes use the same diff value:
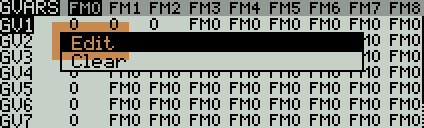
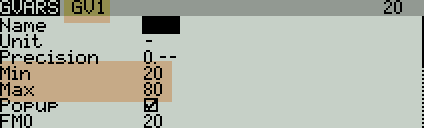
Finally, we set safe limits for the diff adjustment, by setting the Min and Max properties for GV1. (Note: min/max didn't work properly prior to OpenTx 2.2.2).
Switching between different behaviours
In the previous example, we used the system 'ON' switch to permanently activate the special function. Alternatively, we could specify a physical or logical switch.
In the example below, switch SA is used to activate special functions SF1 or SF2:
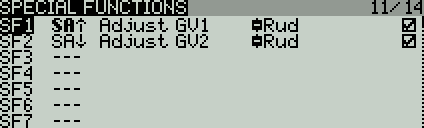
Depending on the position of SA, the rudder trim behaves as a regular trim, or adjusts GV1 or GV2:
- SA-up: trim adjusts GV1
- SA-down: trim adjusts GV2
- SA-mid: default behaviour (adjusts rudder trim)
In more detail:
- SA up: SF1 is active, trim adjusts GV1. Updating of TrmR is suspended.
- SA down: SF2 is active, trim adjusts GV2. Updating of TrmR is suspended.
- SA middle: special functions are inactive, so the trim reverts to its default behaviour bumping TrmR.
Configuring a trim lever as a momentary switch
In this section, we'll see how to turn a trim into a dumb on/off/on momentary switch (actually two momentary switches!). Start by disablng the trim in the Flight Modes menu.
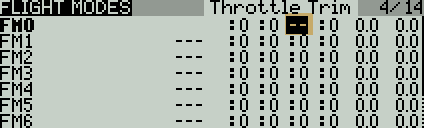
Disabling the trim suppresses the trim's default behaviour, including beeps and repeats. However, as we'll see below, trim clicks can still be captured.
Capturing trim state
Even though the trim is disabled, you can still interrogate its state using any of the following system switches:
- Al - ail trim left
- Ar - ail trim right
- Rl - rudder trim left
- Rr - rudder trim right
- Eu - elev trim up
- Ed - elev trim down
- Tu - throttle trim up
- Td - throttle trim down
These switches are not quite as versatile as regular switches like S1, for example they can't be used as mixer sources, and they are not directly readable from a Lua script. In the following section, we'll look at ways of capturing the trim state in a logical switch, high channel and GVAR.
Capturing the trim state...
... using logical switches
This method uses 3 logical switches to store the state. In the example below L1 is elevator trim down, L2 is trim up, and L3 is the middle position.
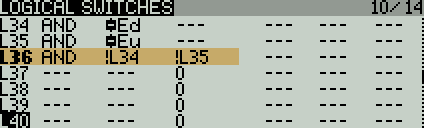
... using a high channel
Alternatively, you can capture the trim state in a high channel as follows:
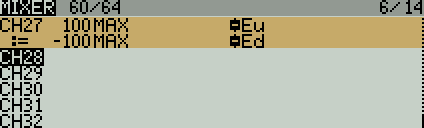
Note that the multiplex option must be set to 'REPLACE' in the second mix.
CH27 return the following values: Trim down=> −100%, centre=0% and trim up => +100%.
... using a GV
Another approach is to store the trim lever state in a single GV. To do this, we update the GV in response to trim clicks using the AdjustGV special function:
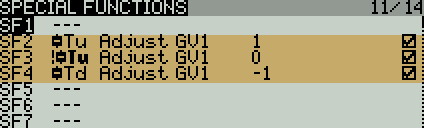
OpenTx executes special functions in order from top to bottom during each processing cycle. This results in the following behaviour:
- click up-> GV=1
- click middle-> GV1=0
- click down -> GV1=-1
Use in Lua scripts
By capturing the trim state using any of the above methods, a Lua script can access the trim state. Lua scripts can repurpose a trim lever to do interesting things. One example is author's crow aware elevator trim script, which turns the elevator trim into a dynamic curve-bender.
As always with OpenTx, the limit is your imagination!