How to make a sequencer (it's easy!)
Introduction to sequencers
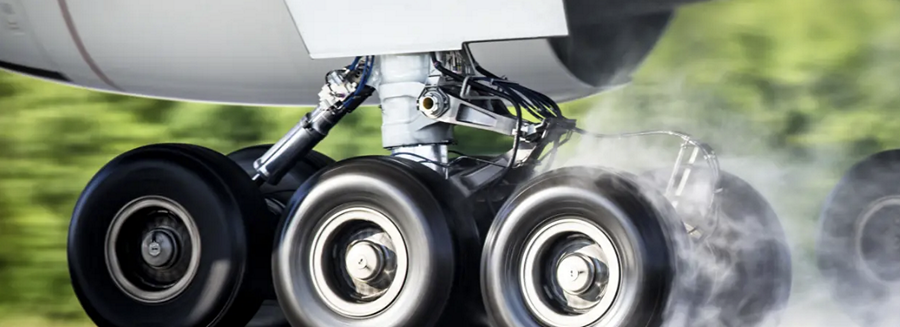
Retractable undercarriages, swing wings, and bomb dropping mechanisms... these all have one thing in common, namely the need for complex movements involving one or more servos. The way this is done is via a sequencer.
In this article you'll learn a simple method for programming sequencers. Unlike the methods you may have seen on YouTube, the technique doesn't rely on tricky programming using delays, slows or logical switches (ouch). Instead, it uses a time base channel plus time/position curves to define the motions. Simple and intuitive!
The method supports:
- multiple servos
- complex motions including pauses and jumps (up to 16 linear segments)
- transit time 0 - 25 seconds
A time based sequencer
The method uses :
- A timebase controlled by a switch (for example a retract switch)
- A time/position curve for each servo
Normally, you might expect the controlling switch - for example the retract switch - to drive the servos directly. With this method, the switch drives the timebase, and the timebase controls the servos via the time/position curves. The benefit is (a) simplicy (no logic involved) and (b) the servos have a defined position at all points on the timeline.
So let's get started!
Example: an undercarriage sequencer
As an example, we'll design a sequencer for a retractable undercarriage system driven by two servos for gear and doors. The retract switch is SF.
Our goal is to achieve the following sequence:
- SF↓
- doors open
- pause
- gear drops
- SF↑ reverses the sequence:
- gear retracts
- pause
- doors close
The total transit time is 6 seconds.
Create the timebase
The first task is to create the timebase. We'll use CH1, though it could be any unused channel.
- Create a mixer with Source = SF.
- Set slow↑ and slow↓ to 6 seconds each.
CH1:Timebase
Source=SF, Weight=100%, slow↑=6, slow↓=6
Create mixers
Next,
- Create the mixers for the gear and doors.
- Set both mixer sources to the timebase channel.
- Set the weight to 100%.
CH2:Door
Source=CH1:Time, Weight=100%
CH3:Gear
Source=CH1:Time, Weight=100%
The outputs of CH1 and CH2 follow the timebase CH1. In other words, as SF is toggled, the outputs ramp linearly and smoothly between -100% and +100%.
In order to provide the complex motions for driving the u/c system, we need to insert the time/position curves...
Create the motion curves
To create a motion curve,
- Identify the number of segments required
- Create a curve of type 'custom' (so you can set custom x values).
- The number of points to one greater than the number of segments.
For our u/c example:
- The door curve (CV1) requires two segments, so three points.
- The gear curve (CV2) requires three segments, so four points.
- The left hand end (x = −100) is the resting position when SF is up.
- The right hand end (x = 100) is the position 6 seconds after SF is moved down.
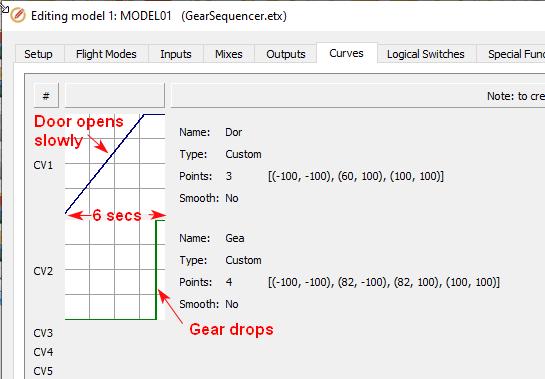
Motion curves for door and gear. x-axis is time, y-axis is position.
Note:
- The steeper a segment, the faster the commanded speed.
- A horizontal segment generates a pause.
- A vertical segment generates an instantaneous jump. (To create a vertical segment, set identical x-values for the end points.)
Ensure that each segment is slow enough for the servo to keep up, otherwise the servo and sequencer will lose sync temporarily. (In our example CV2 has a vertical segment where the gear drops - in practice the servo response will not be instant, so it would be better for the segment to be sloped.)
Inserting the time/position curves
Having defined our time/position curves, it's time to go to the Mixer menu and insert the curves into the gear and door mixes.
Here's a screen grab of Companion showing the mixer configuration including the curves:
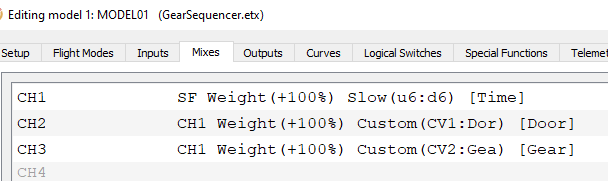
And that's it! Note the simplicity of the solution.
Adjusting the servo limits and centres
The servo directions, travels and centres should be adjusted in the Outputs menu. Keep the mixer weights at +100%.
Maintaining sync at startup
When the radio is switched on, the retract state and switch must be in sync otherwise the servos will jump suddenly, potentially causing a clash. (This is not a limitation of the sequencing method... it's because our radios have no way of knowing the actual position of the servos.)
To ensure a safe switch-on: (a) always put the u/c in the same state (retracted or deployed) before switching off, and (b) always put the retract switch in the corresponding state when the radio is switched on - use EdgeTX's startup checks to remind you.
Undercarriage sequencer video
Here is a video of the sequencer running in the Companion simulator.
Expanding the sequencer
The method can be easily expanded for additional servos, or more complex paths. For example, you could arrange for the doors to close again, after the gear is deployed - it's just an additional segment. For dual retracts, you could add another two servos and stagger their motions. In fact, the complexity of the sequence is limited only by your imagination!